Erika Joanne Art
  • HOME
  • (SHOP)
    • ♡ Erika's Class Supplies
    • ♡ DiGiTAL ePRODUCTS
    • ♡ Paint & Pencil Patterns
    • ♡ Winter
    • ♡ Fall
    • ♡ Summer
    • ♡ Spring
    • ♡ Acrylic Patterns
    • ♡ Pencils & Tools
    • ♡ Surfaces & Stencils
    • ♡ Jo Sonja® Paints
    • ♡ Jo Sonja® Brushes +
    • ♡ Clearance
  • TEACHERS
    • Teachers >
      • ErikaJoanne
      • BarbaraBoardman
      • BobbieRedington
      • CathyBaldwin
      • HeatherVickery
      • KathyVanHorne
      • MaggieAnderson
      • MicheleWimmers
      • RaymaStewart
      • StephanieRobinson
      • WendyGoldberg
    • Teaching POLICY
    • CETiP Certification
    • CETiP Teacher Access
  • ViP MEMBERS
    • BECOME A ViP MEMBER
    • ViP MEMBER ACCESS
  • iNFO
    • ABOUT US
    • Contact
    • Ordering & Shipping
    • Q & A
    • SUBSCRIBE
    • GALLERY
    • Our FAVS

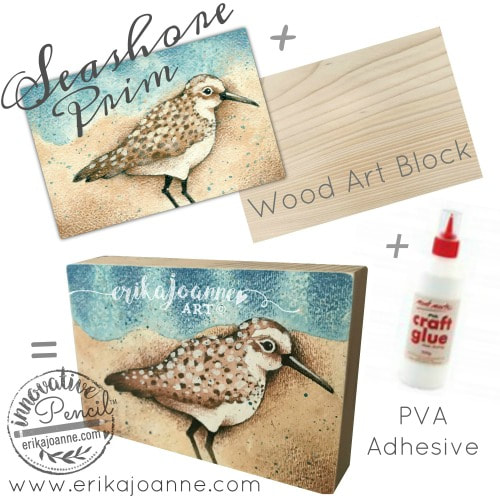
Adhering Your Artwork to Wood

4/3/2019

0 Comments

 
Picture
                                             8 Gluing Tips for Artists

  1. Seal the Wood
    First apply wood sealer to your wood. We recommend Jo Sonja's All Purpose Sealer. Lightly sand your wood if needed. Then use a large flat brush to apply the sealer evenly over the entire surface (front & back). Let dry, sand and wipe clean. We have several wood choices available HERE >

  2. Choice of Glue
    When gluing artwork, it is best to use an acid free/neutral ph glue. PVA glue fits this criteria and works great! This strong permanent adhesive dries clear and remains flexible. Perfect for artists! We carry both 4oz and 8.8oz choices of PVA glue HERE >

  3. Preparation of Artwork
    Make sure your artwork is completely dry and is set and ready to glue (your paper should be set with barrier coat of either a fixative spray or Jo Sonja's Fast Drying Glaze Medium). It should also be free of any embellishments like rhinestones, buttons or other added items. If adding embellishments, add them after your piece has been glued to the wood. The size of your artwork should be the same size or slightly larger than the wood surface you'll be gluing it to.

  4. Gluing
    Use an old credit card to spread an ample amount of glue over the surface of the wood (it should be enough to spread over the surface but not so much that would cause a lot of oozing when the paper is adhered). Completely cover the wood area to be glued. Place your artwork over the glued area and position it where you want it. Place a piece of wax paper over your artwork and press your artwork in place. Firmly roll over your artwork with a brayer to to remove any air bubbles and smooth out the surface.

  5. Cleaning up
    Use a cotton swab damp with clean water to remove any glue that might have oozed out the edges. Make sure the artwork is free of glue and the edges have been cleaned well.

  6. The Weight
    Place heavy books over your glued piece and let it set overnight. Make sure the weight is larger than your artwork. You can place a clean piece of plastic wrap over your artwork as a barrier to protect it while it sets. When you check it the next day, if your artwork feels cold or moist, you'll need to let it continue setting until the moisture of the glue has completely dried.

  7. Sanding Edges
    Once your artwork has been glued to the wood and is nice and dry, you'll need to sand off any paper hanging over the edges of the wood. Use sand paper or a sanding pad to carefully sand off and smooth the edges. You can find Edge Sanders HERE >

  8. Finishing
    Now that your artwork is nicely adhered to the wood, you can finish your piece as a whole. It is important to paint and finish all sides of the wood because the wood could warp otherwise. Choose a color that matches your artwork and basecoat the sides and back of the wood with a large brush. Now completely varnish your piece (all sides) with several coats of varnish. (Before applying varnish over the top of your artwork, make sure you have a barrier coat of fixative or Jo Sonja's Fast Drying Glaze Medium previously mentioned in "Preparation of Artwork" step.) Let each coat of varnish dry before adding another. Then glue any added embellishments (rhinestones, buttons etc) to your artwork with tacky glue or hot glue.
0 Comments
    Picture
    I'm Erika Joanne, an artist who enjoys "Sharing Innovative Ways to Paint & Pencil". Paint and learn with me through my pattern packets, videos & workshops. Enjoy!

    Subscribe!

    Picture
    We would love to have you join us! Just use this QR Code to quickly sign-up to our email list using your smart phone.

    Archives

    May 2020
    December 2019
    April 2019
    February 2019
    November 2018
    August 2018

    Categories

    All

    RSS Feed


Home   SHOP   Calendar   Ordering 

~ The Lord is my light; He is my joy and my song. ~
​
All Content & Images ♡ COPYRiGHT © 2023 Erika Joanne Art
Just so you know... We absolutely want you to paint & create our designs, that makes us very happy! On the other hand... It is not cool when our artwork and graphics are copied from our website. Remember ~ If in Doubt, Ask About ~ So legally speaking, our artwork is copyright protected. Copying any part of our website, or the whole enchilada, is expressly prohibited. 
  • HOME
  • (SHOP)
    • ♡ Erika's Class Supplies
    • ♡ DiGiTAL ePRODUCTS
    • ♡ Paint & Pencil Patterns
    • ♡ Winter
    • ♡ Fall
    • ♡ Summer
    • ♡ Spring
    • ♡ Acrylic Patterns
    • ♡ Pencils & Tools
    • ♡ Surfaces & Stencils
    • ♡ Jo Sonja® Paints
    • ♡ Jo Sonja® Brushes +
    • ♡ Clearance
  • TEACHERS
    • Teachers >
      • ErikaJoanne
      • BarbaraBoardman
      • BobbieRedington
      • CathyBaldwin
      • HeatherVickery
      • KathyVanHorne
      • MaggieAnderson
      • MicheleWimmers
      • RaymaStewart
      • StephanieRobinson
      • WendyGoldberg
    • Teaching POLICY
    • CETiP Certification
    • CETiP Teacher Access
  • ViP MEMBERS
    • BECOME A ViP MEMBER
    • ViP MEMBER ACCESS
  • iNFO
    • ABOUT US
    • Contact
    • Ordering & Shipping
    • Q & A
    • SUBSCRIBE
    • GALLERY
    • Our FAVS